
Complete Walkthrough: Installing Nvidia Drivers on Linux.

Lessons are meant to be learnt , a new lesson in unveiling it’s features Complete Walkthrough: Installing Nvidia Drivers on Linux.
The opulent NVIDIA Driver, a magnificent software masterpiece, serves as the conduit for seamless communication between your esteemed Linux operating system and the illustrious NVIDIA GPU hardware.
In the realm of Linux, the open-source Nouveau driver reigns supreme, gracefully preinstalled to cater to your needs. However, should you desire to unlock a realm of unparalleled possibilities, the installation of the resplendent Nvidia driver shall bestow upon you a plethora of opulent features, including impeccable compatibility with your esteemed video card hardware.
Prerequisites to Install Nvidia Drivers in Linux
Before installing Nvidia Drivers in Linux, make sure your system is meeting below specifications:
- A Server running Linux VPS.
- A non-root user with
sudoprivileges. - An Nvidia GPU.
Preparing for Nvidia Driver Installation on Linux
The first step you should take after installing Ubuntu Desktop if your machine is equipped with an NVIDIA GPU is to install the NVIDIA GPU drivers.
To Find out whether NVIDIA GPU is installed on your system, run:
$ lspci | grep VGA
In the output, you can see which NVIDIA is installed on your system.
Linux systems use the open-source Nouveau drivers by default for NVIDIA graphics cards.
The proprietary NVIDIA drivers are not being used until you install them.
Run the command below to check if your Linux system is using the open-source Nouveau drivers:
$ lsmod | grep nouveau
To verify if Nvidia drivers are installed, execute the command below to check if the output displays the proprietary NVIDIA drivers. On Ubuntu, you can begin using it by searching for the NVIDIA X Server Settings app in the Application Menu of your Ubuntu desktop.
$ lsmod | grep nvidia
Methods to Install Nvidia Drivers on Ubuntu and Debian
There are 4 quick ways to Install Nvidia Drivers on Debian and Ubuntu:
- Command Line
- GUI
- PPA Repository
- Official nvidia.com package
Using Command Line to Install Nvidia Drivers on Ubuntu/Debian
Terminal users can utilize this method to install Nvidia on Ubuntu. Simply follow the steps below to install Nvidia Driver via Command Line.
Begin by searching for Nvidia drivers. To accomplish this, press Ctrl+Alt+T or type “terminal” in the Application menu to open the Terminal and execute the following command:
apt search nvidia–driver
A list of your GPU’s available drivers is displayed in the output. Also, you can run the following command to search the package:
apt-cache search nvidia-driver
The official non-free and contrib repository for Debian includes NVIDIA drivers.
However, these repositories are not enabled by default in Debian.
To enable them, use the following command initially:
sudo apt-add-repository contrib
sudo apt-add-repository non-free
As always, you will continue with updating your system package repository. Run the following command to do this before installing the driver:
sudo apt update
sudo apt upgrade
Now, you are ready to install your considered Driver according to your GPU. From the list of available GPU drivers, select one to install.
Usually, the latest tested proprietary version can be the right choice. Here is the syntax for installing a driver:
sudo apt install [driver_name]
The necessary packages will all be downloaded and installed. It will take some time to finish.
So once the right driver is installed on your Ubuntu system, use the following command to reboot it:
sudo reboot
As a verification, you can use the command below to view GPU information and the process which are using Nvidia GPU.
nvidia-smi

- Click the Additional Drivers Tab and wait for the application to download a list of any new GPU drivers that are available.
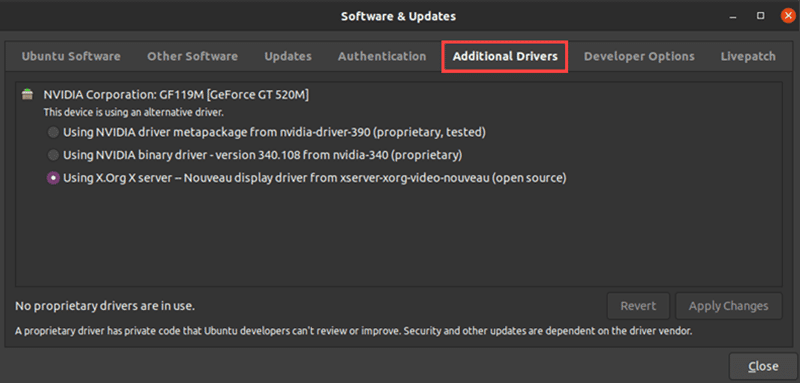
Your computer’s driver that is currently installed is the default choice. Usually, an open-source Nouveau display driver.
- Here is where you can choose a driver. To do this, choose the most recent Nvidia driver with the designation “proprietary, tested” from the list.
This is the most recent stable driver for your GPU that Nvidia has released.
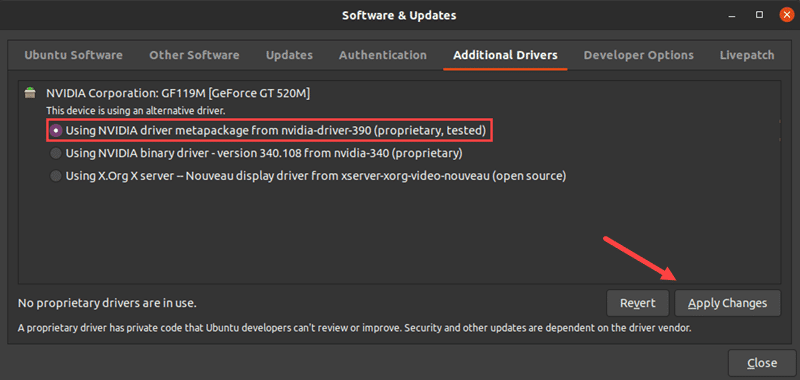
Enter your password and watch for the installation to be completed, after clicking on Apply Changes As you see above.
- Finally, to make the modifications effective, restart your Ubuntu Linux computer.
You can also use the below commands to do this:
sudo shutdown -r now
OR
sudo reboot
In this way, the Nvidia drivers will be used on the next time boot up.
Using PPA Repository to Install Nvidia Drivers on Ubuntu
Developers can distribute software not available in the official Ubuntu repositories through the PPA repository. This means that installing the latest beta drivers carries the risk of an unstable system.
Follow these procedures to install the most recent Nvidia drivers via the PPA repository:
- First, you need to add the PPA GPU repository to your Ubuntu system. To do this, run:
sudo add-apt-repository ppa:graphics-drivers/ppa
When prompted to add the repository, enter your password and press Enter.
- Once the graphics drivers repository is added, it is time to verify the model of the GPU and view all available drivers.
- To do this, use the command below to identify your current GPU model and view a list of available drivers for that GPU:
ubuntu-drivers devices
- Now that you have detected which GPU model you are using, you are ready to install the Nvidia driver. The syntax of installing a specific driver is something like below:
sudo apt install [driver_name]
Also, you can use the following command to install recommended drivers automatically:
sudo ubuntu-drivers autoinstall
Using Official nvidia.com package to Install Nvidia Driver on Debian
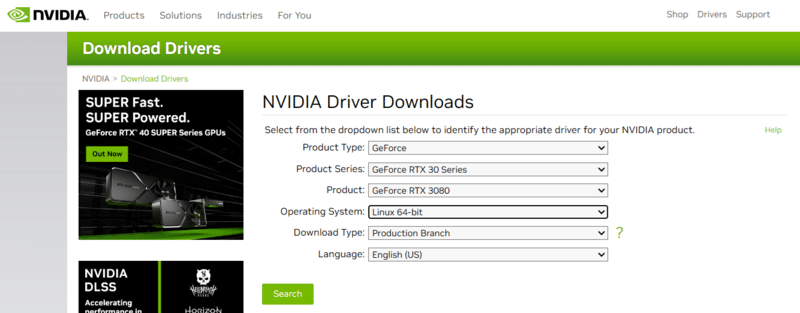
Visit the official Nvidia.com website to obtain the recommended Nvidia source package. Identify a package name that corresponds to the driver’s number.
In your home directory, save the downloaded file.
To install Nvidia driver compilation prerequisites, run:
# apt -y install linux-headers-$(uname -r) build-essential libglvnd-dev pkg-config
Use the command below to disable the default nouveau driver:
echo blacklist nouveau > /etc/modprobe.d/blacklist-nvidia-nouveau.conf
# update-initramfs -u
To reboot to multi-user runlevel and disable the GUI user after reboot, type:
# systemctl set-default multi-user.target
# systemctl reboot
To install the Nvidia driver, login as root user and run:
# bash NVIDIA-Linux-x86_64-535.104.05.run
Run the following command to enable the system to boot into GUI:
# systemctl set–default graphical.target
Finally, reboot your Debian system:
# systemctl reboot
How to Install Nvidia Drivers on CentOS
Support for Nvidia video graphic cards in CentOS is provided through the open-source nouveau driver.
To install the official Nvidia driver as a proprietary alternative in case the Nouveau driver is inadequate, follow these steps:
Execute the command below to identify your Nvidia graphic card model:
# lshw -numeric -C display
Depending on your Linux operating system and Nvidia card model, you can use search parameters to obtain the Nvidia driver package from nvidia.com.
Alternatively, if you are proficient in this area, you have the option to retrieve the driver directly from the Nvidia Linux driver list.
Once everything is prepared, ensure you have a file similar to the one below:
$ ls NVIDIA-Linux-x86_64-*
Run the commands below to install all compile prerequisites:
# yum groupinstall “Development Tools”
# yum install kernel-devel epel-release
Optional for installing dkms package, which guarantees the ongoing compilation and installation of Nvidia kernel modules in the event of a new kernel update:
# yum install dkms
Modify the configuration file located in /etc/default/grub to disable the nouveau driver. Nouveau.modeset=0 should be added to the line that begins with GRUB_CMDLINE_LINUX.
When you are finished, use the following command to apply the new GRUB configuration change:
BIOS:
$ sudo grub2-mkconfig -o /boot/grub2/grub.cfg
EFI:
$ sudo grub2-mkconfig -o /boot/efi/EFI/centos/grub.cfg
Restart the Linux CentOS system. Verify that the nouveau open-source Nvidia driver is no longer in use when the boot is complete:
# lshw -numeric -C display
Now you can compare the results of the first time you used the above command with the output of the lshw command.
It is necessary to install the Nvidia drivers while the Xorg server is suspended. Change to text mode by running the command below:
# systemctl isolate multi-user.target
To install the Nvidia driver, type:
# bash NVIDIA-Linux-x86_64-*
When asked, select YES to install the NVIDIA 32-bit compatibility libraries and allow your X configuration file to update automatically.
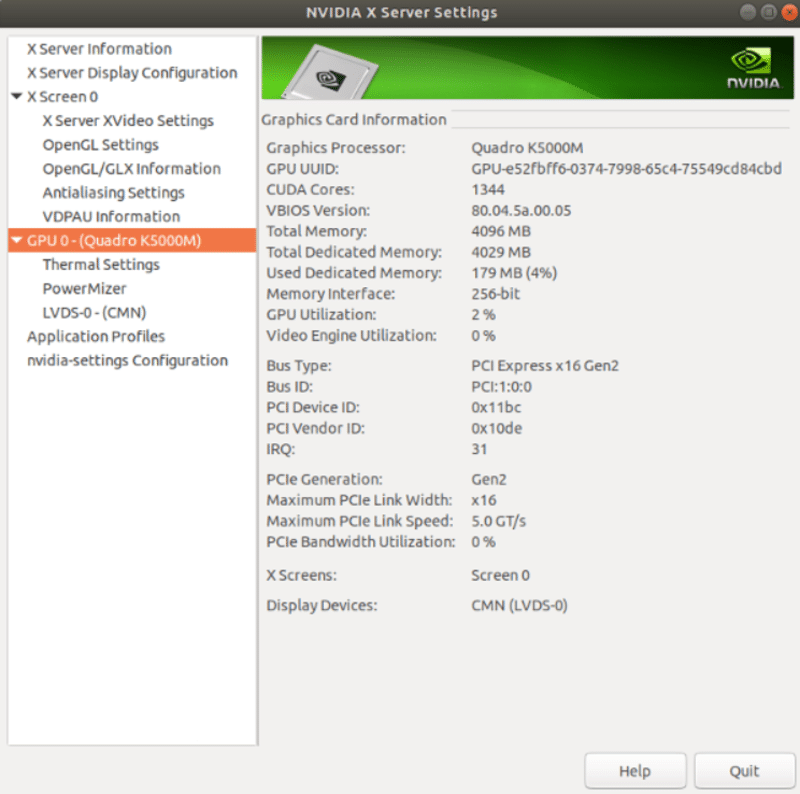
That’s it! This should install the Nvidia driver on your CentOS Linux system. To further customize your Nvidia graphic card settings, restart your computer, log in, and run:
nvidia-settings
How to Install Nvidia Drivers on RHEL
The NVIDIA Driver facilitates communication between Red Hat Enterprise Linux and your hardware, the NVIDIA Graphics GPU.
After halting the GUI and deactivating the nouveau driver via the GRUB boot menu, you can install the NVIDIA drivers using the bash command.
$ lspci -vnn | grep VGA
Using search parameters determined by the model of your Nvidia card and the Linux operating system, download the Nvidia driver package from nvidia.com.
As an alternative, you can download the driver straight from the Nvidia Linux driver list.
$ ls NVIDIA-Linux-x86_64-*
Run the below commands to install all necessary dependencies for the compilation and installation of the Nvidia drivers.
# dnf groupinstall “Development Tools”
# dnf install elfutils-libelf-devel libglvnd-devel
Change the GRUB boot menu to permanently disable the nouveau driver and then reboot your system:
# grub2-editenv – set “$(grub2-editenv – list | grep kernelopts) nouveau.modeset=0”
# reboot
Use the following command to switch to the text mode:
# systemctl isolate multi-user.target
To install the Nvidia driver, type:
# bash NVIDIA-Linux-x86_64-*
When asked, select YES to install NVIDIA’s 32-bit compatibility libraries, replace any pre-existing libglvnd files, and allow your X configuration file to update automatically.
Again, reboot your system:
How to Install Nvidia Driver on Fedora
Install Nvidia Driver on Fedora via RPM Fusion:
Update your system before going through the installation process:
sudo dnf update
To identify your graphics card, run:
lspci -vnn | grep VGA
Use the following command to enable the RPM Fusion repository:
sudo dnf install https://download1.rpmfusion.org/free/fedora/rpmfusion-free-release-
sudo dnf install https://download1.rpmfusion.org/nonfree/fedora/rpmfusion-nonfree-release
Execute the command to install the relevant drivers for your graphic card, and reboot your system once the installation is complete.
Install Nvidia Driver on Fedora Manually:
To manually install Nvidia drivers on your PC, use the following command to identify your Nvidia graphics card:
lspci -vnn | grep VGA
Visit the official NVIDIA driver page and utilize the search parameters to acquire the drivers that are most compatible with your hardware.
If you already know the drivers required for your system, obtain the necessary driver package from the Nvidia Linux driver list.
Next, install the freshly downloaded drivers package.
Utilize the commands below to install several prerequisites necessary for setting up and compiling Nvidia drivers on Fedora:
sudo dnf groupinstall “Development Tools”
sudo dnf install libglvnd-devel
Then, disable the nouveau driver by running the below command:
sudo grub2-editenv – set “$(sudo grub2-editenv – list | grep kernelopts) nouveau.modeset=0”
The above command will permanently disable the Nouveau driver and alter the GRUB boot menu.
To restart the system, type:
sudo reboot
To access your system remotely, it’s recommended to enable an SSH server on your computer, as the system can boot up without a graphical user interface.
Use the following command to transition from GUI mode to text mode, allowing you to install the drivers:
sudo systemctl isolate multi-user.target
Run the following command to install the drivers on your system and reboot your system when you are finished:
sudo bash NVIDIA-Linux-x86_64-* -y
sudo reboot
To get your system back into its normal state, type:
sudo systemctl restart systemd-logind
How to Install Nvidia Driver on Kali Linux
Follow the below steps to install Nvidia GPU drivers on Kali Linux, along with the CUDA toolkit
First, ensure your system is updated:
$ sudo apt update
$ sudo apt -y full-upgrade
$ sudo apt -y autoremove
$ reboot
To determine which video card is installed and confirm that it is using the nouveau open-source driver, run:
$ lspci | grep -i vga
Run the command below to get information about the drivers installed.
$ lspci -s 00:02.0 -v
Note: 00:02.0 is the number from the previous output.
To install the drivers and CUDA toolkit, type the command below and reboot your system when you are finished:
$ sudo apt install nvidia-driver nvidia-cuda-toolkit
$ reboot
You can run a benchmark test with hashcat.
$ hashcat -b | uniq
How to Configure NVIDIA Graphics Driver
Use the nvidia-settings command to access a GUI application that enables customization of the NVIDIA graphics driver, perfect for configuring multiple external screens or monitors connected to your system and viewing GPU information.
nvidia-settings
Starting it as follows will save your settings:
sudo nvidia-settings
How to Change Drivers Using Terminal on Ubuntu
Ubuntu provides users with a convenient tool called ubuntu-drivers command, enabling them to effortlessly handle binary drivers for Nvidia and other devices using a non-GUI approach.
Follow the below steps to change drivers.
- To view all driver packages (Apply on the current system), run:
sudo ubuntu-drivers list
In this way, all applied driver packages on the current system would be listed.
- To show all enabled OEM packages, type:
sudo ubuntu-drivers list-oem
In this way, all OEM enablement packages that apply to your system will be displayed.
- Regardless of Linux commands you can use to Get System and Hardware Information, the below command allows you to view all Nvidia hardware devices that require drivers and which software packages:
sudo ubuntu-drivers devices
- To install a specific driver Nvidia version, you can use the following command and install it automatically:
sudo ubuntu-drivers install
How to Switch to the Nouveau Drivers
You can switch to the open-source Nouveau drivers if you’re experiencing issues with the proprietary NVIDIA drivers or if you simply no longer wish to use them.
For example on Ubuntu:
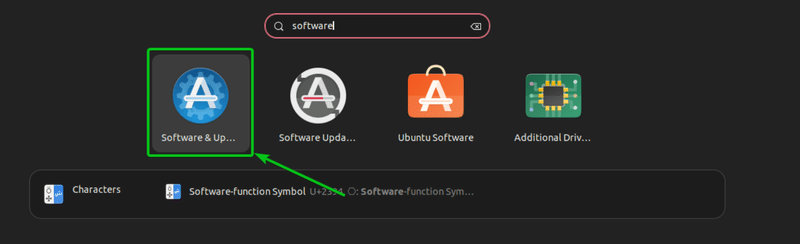
Open Ubuntu Desktop’s Software & Updates application from the Application Menu to switch to the open-source Nouveau drivers.
Select the Using X.Org X server – Nouveau display driver from the list on the Additional Drivers tab and then click Apply Changes, as indicated in the image below.
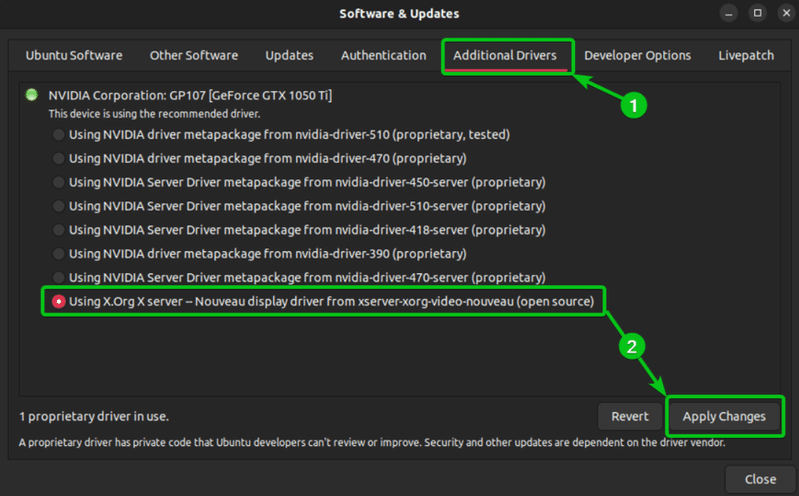
Once the Authentication Required page is opened, enter your password and click on Authenticate to log in.

After a successful login, the Software & Updates app will transition to the Nouveau open-source drivers. It’ll take a while to finish.
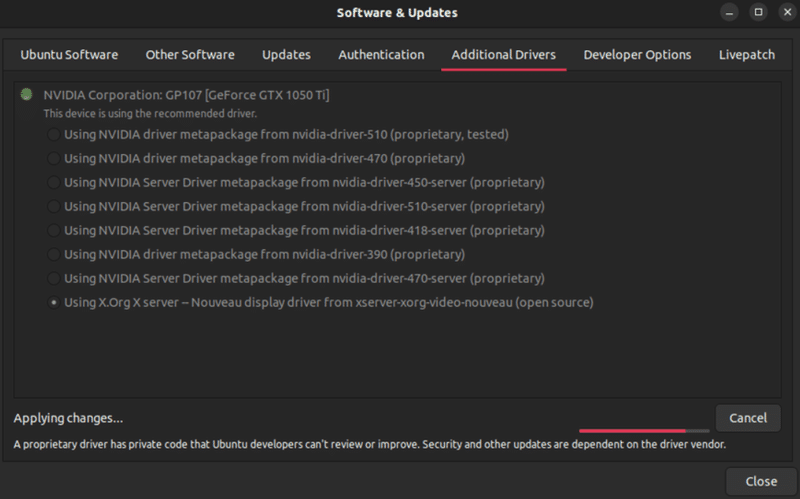
The Software & Updates app should now switch to the Nouveau open-source drivers.
When you are finished, open the Terminal application, then restart your machine to make the changes effective:
$ sudo reboot
Certainly, the next time your computer boots, the open-source Nouveau drivers will be used.